Subscribe For Free Updates!

We'll not spam mate! We promise.

Thursday, 2 July 2015

Shareing Your Blog Posts On Google+ In Blogger Automatically 2015-2016

As we all know that Google is improving Blogger platform and introducing new features one by one. There is a good news for everyone who uses Blogger.com as his/her blogging platform that Google has recently introduced a new update by which we can easily share our blogger posts on Google+ automatically. Sharing the blog content on Google+ gives several benefits. First benefit is it drives the traffic from Google+ and secondly if you've the mega blog with a lot of fans on your Google+ profile then they will be get notified whenever you update your blog, this will help to serve your readers better. Third thing is that sharing posts on Google+ brings more power to your Google authorship and also in the search rankings.
Before this feature, there was another option which was being used by many bloggers to socialize their blog content on Google+ and it was that whenever you publish the new post on your blog then the prompt automatically pops up to share that latest post on Google+. Most of bloggers, was being annoyed by this and there was also option to disable that prompt. I think Blogger team has researched on it and found that introducing the automatically share feature will be better instead of prompt option. Well, Let's start the tutorial on how can we enable this latest feature to our blogs.

Auto Share Blogger Posts On Google+

There is not any long tutorial for enabling this feature but the most easiest thing you've to do is just tick mark the box. But here, I'll be guiding you little more informative.

Firstly, You need to connect the Google+ account to your blogger account. I think most of our friends have already connected the Google+ account to their blogger account but just for the newbies, Below screenshot will help them to connect that.
After connecting or reverting to the Google+ profile then you've to enable this latest feature which is about automatically share after publishing. To enable this, Just Go toBlogger >> Google+ and Tick Mark "Automatically Share After Posting".
Congratulations Mate! You've successfully enabled this latest feature. Now whenever you'll publish the new post on your blog then it will be automatically shared. Just publish post now for trying this feature.

Final Words

So friends, This was the quick update in which I've informed my readers about the latest update from Blogger. This is the fantastic feature and everyone must enable this feature just to save the time in sharing posts on Google and it also gives a lot of benefits. Get in touch with us and also subscribe us to know about the latest updates for Blogger. Don't forget to share your views in comments below! Take Care!

Adding Meta Description In Every Post In Blogger

As you all of you knows that in the new Blogger interface the search preferences section is added which helps the user to make his/her blog more search engine friendly. That section really contains such great things and from today I'm going to discuss with you on each and every part of search preferences section. Well, So today we're going to learn the first part of search preferences which is Meta Description. In the old interface we were unable to use meta description in each and every post, we only used to add that description to homepage only by manually. But now every one can add it in every post and page without touching any HTML or XML coding. You just need to enable it from search preferences section.


What is Meta Description?

Meta description is an HTML or XML element that describes the web page to search engine's crawler. In other words it tells the information about your web page to search engine's crawler so that search engine may provide your web page in search results on proper place. It also shows in the search results page so that the user may know that what kind of page it is. 

Adding Meta Description In Every Post With Blogger

By default in blogger that is disable so we'll need to enable it after that we can use it. In this section the meta tags will enable for homepage only and the last section of this will show you that how can you use these tags for every post. Simply the follow the below steps.
  • Go To Blogger >> Settings >> Search Preferences
  • Look For Meta Tags Section and Tick "Yes" To Enable It.
  • Now a box will appear where you have to write your meta tag or description. Make sure that it doesn't exist 150 characters.
  • Click Save Changes!
Now here is one problem! If you are using custom blogger template then continue reading this. The problem is that sometimes custom blogger templates doesn't work with these meta tags but if you are using blogger default template then it's fine. In order to work properly meta tags with custom blogger templates you will need to insert an short XML code in your template which we will solve this issue. Simple follow the below steps.
  • Go To Blogger >> Template >> Edit HTML
  • Search For <head> and Paste The Following Code Below <head>
<b:if cond='data:blog.metaDescription != &quot;&quot;'>
<meta expr:content='data:blog.metaDescription' name='description'/>
</b:if>
  • Save Your Template and You have successfully added meta tags for homepage.
  • Now let's jump to next step. 

Adding Meta Tags In Every Post

After enabling meta tags for homepage, it's time to add these tags in every post. Now when you will go to any post editor or create new post, You will see "Search Description" section in the sidebar where you have to simply write your description for that post. This search description section was disabled but after enabling for homepage it is also enable for every post and page. 
Write your description for every post in that box and publish it. Is it not so easy?
Can Dogs eat Green Peppers

heath-tricks add Horizontal Social Buttons Bar Below Post Title In Blogger


Social networking buttons, plugins and widgets are known as one of the most important things for a blog as it helps in various places like gaining more traffic from social sites, allowing readers to share your posts and many more. Previously, we had shared manysocial and as well as other widgets which are placed in our widget library and today we're going to share another beautiful widget which is going to help you and your blog from many sides.

Horizontal Social Buttons Bar

This is the horizontal social sharing button bar which we're going to share today. This looks beautiful in the design as the buttons are placed in good manner and each button is separated in squares. This social buttons bar comes with a title which will help to get more shares and four different buttons from different social sites. These four buttons are Twitter's tweet button, Facebook's like button, Google Plus's +1 button and Stumble Upon's stumble it button. These all buttons are from well reputed social sites which are being used widely in the world and they will definitely help you, me and other or whoever use this, will get good number of traffic towards his blog from these social sites. And there is nothing to do for receiving traffic, you just need to place those buttons on your blog and your readers will automatically do the job if you've some loyal readers. I mean, they will socialize your content which can help you to receive good traffic. Basically, these buttons are built with XML, CSS, HTML and JavaScript which are used by developers of these buttons to prepare them. We've customized the coding of these buttons in such way that they will only load when they're needed and it really helps in improving the page load speed of your blog and it is also important to take a note about it while implementing new things in your blog.

Adding Horizontal Social Buttons Below Post Title In Blogger

Implementing this new horizontal social bookmarking button bar below post title in blogger is not a difficult task but you might need a hint or help if you're newbie so below we're going to guide you step by step on how can we do this. 
  • Go To Blogger >> Template >> Backup Your Template
  • Click Edit HTML and Find For </head> 
  • Just Above </head> Paste The Following Code.
<b:if cond='data:blog.pageType == "item"'>

<script type='text/javascript'>

// Twitter
(function (a, b, c){var d=a.getElementsByTagName(b)[0];if (!a.getElementById(c)){a=a.createElement(b);a.id=c;a.src="//platform.twitter.com/widgets.js";d.parentNode.insertBefore(a, d)}})(document, "script", "twitter-wjs");
// Stumbleupon
(function (){vara=document.createElement("script");a.type="text/javascript";a.async=true;a.src="https://platform.stumbleupon.com/1/widgets.js";var b=document.getElementsByTagName("script")[0];b.parentNode.insertBefore(a, b)})();

</script>


<style type='text/css'>

/*Social Bar By Blogger Yard ----------------------------------- */
#SocialBar {
    float: left;
    border-top: 1px solid #eaeaea;
    border-bottom: 1px solid #eaeaea;
    width: 610px;
    margin-bottom: 20px;
    margin-left: -10px;
    margin-top: 10px;
}

.headingsharer h5 {
    float: left;
    padding-right: 20px;
    padding-top: 18px;
    text-transform: uppercase;
    font-weight: bold;
    margin: 0px;
    padding-left: 10px;
}

.tweeetero, .fbwolo, .g-plusones, .stumblo {
    float: left;
    border-left: 1px solid #eaeaea;
    padding-left: 18px;
    padding-top: 15px;
    padding-bottom: 10px;
}

.g-plusones {
    margin-left: 20px;
}

</style>

</b:if>
  • Click Save Template and You're Half Done!
  • Now Search For <div class='post-body entry-content'>
  • And Above It Paste The Following Code.
<b:if cond='data:blog.pageType == "item"'>
<div id='SocialBar'>
<div class='headingsharer'>
<h5>SOCIALIZE IT →</h5>
</div>
<div class='tweeetero'>
<a class='twitter-share-button' expr:data-text='data:post.title' expr:data-url='data:post.url' href='https://twitter.com/share'>Tweet</a>
</div>
<div class='fbwolo'>
<iframe allowtransparency='true' expr:src='"//www.facebook.com/plugins/like.php?href=" + data:post.url + "&send=false&layout=button_count&width=80&show_faces=false&action=like&colorscheme=light&font&height=21"' frameborder='0' scrolling='no' style='border:none; overflow:hidden; width:80px; height:21px;'/>
</div>
<div class='g-plusones'>
<div class='g-plusone' data-size='medium' expr:data-href='data:post.url'/>
</div>
<div class='stumblo'>
<su:badge expr:location='data:post.url' layout='1'/>
</div>
</div>
</b:if>
  • Click Save Template!
  • You're Done! 
Can Dogs eat Green Peppers

Adding Email Subscription Box In Header With Social Icons

Previously, we've created some widgets which were Socializer WidgetEmail Subscription Widget and we  releasedTech Shadow blogger template. In that template we'd created the email subscription widget with social icons in header and here we're going to share that widget with all you guys. This is the best widget to increase the email subscribers instantly and the main thing is it's place. In header, it will be shown to every one and there will be a lot of chances that any visitor may subscribe you through that widget. Even you can see that we've also added the subscription widget in header. Installing this widget in your blog is not so difficult but before the tutorial let me tell you something about that widget.

Header Email Subscription Widget With Social Buttons


This is the stylish and clean header email subscription widget in which social buttons or icons are also available for increasing social followers. This widget is divided into two sections. Left portion of this widget is having subscription form where Name and Email field are implement along with the subscribe button. Heading and a little spam message is also available in that area. While right portion of this widget is having the social buttons which are Facebook, Twitter, Google+, Feed burner and Pinterest. This widget is gonna obviously help you in increasing your email subscribers and social fans because this will be implemented in the header and header is the great place for attracting your visitors for subscribing you.

Tutorial


Well, I've told you something about this widget and now you may be want to implement it in your blog. Don't worry you can do this just following the simple steps below.
  • Go To Blogger >> Layout >> Add a Gadget (In The Header Area)
  • Choose HTML/JavaScript and Paste The Following Code In The Content Box
<style>

 #byard-topsubsbox {background:#fff; width:940px!important; height:90px!important;margin-top:20px; padding:10px;box-shadow:5px 5px 5px #ccc; border:1px solid #ddd;overflow:hidden;}
  #subscriptionsection {float:left;border-right: 1px solid rgb(168, 168, 168);padding-right: 56px;margin-top: -10px;padding-top:9px;}
  .subsbox-heading {font-size:20px; font-family:&#39;Source Sans Pro&#39;; text-align:center;text-shadow:1px 1px 1px #ABABAB;font-weight:bold;}
  .topsubsboxname {background:#fff url(https://blogger.googleusercontent.com/img/b/R29vZ2xl/AVvXsEgt_TM85DiVoTtRx9v78rcv32r3eIkUESJQoURQAKJaLuhrhh-CKSL3m2Ap5Lv3lgricfMi1WWMTX-QDeJ1uJwqGbG-Dh0Cn0ctTyzku3jH06olddqE8qP6gUoTzm3gkED8GVMWti6zSwg/s320/name.png) no-repeat 7px 8px;border:1px solid #ddd; font-family:Arial,sans-serif; font-size:13px; font-weight:bold;color:hsla(0,0%,27%,0.69); width:150px; margin-top:10px; height:24px; padding:5px 15px 5px 28px; vertical-align:top; display:inline-block;margin-left:15px;}
  .topsubsboxemail {background:#fff url(https://blogger.googleusercontent.com/img/b/R29vZ2xl/AVvXsEi7DciElH0MrIUGBhV0yddCmvsve3HoyF3fla-bR-m69KsZ_E2tAFKvtDNbr_UROAKmKEbIrpj0LKRUUEmoQskXLwoRxIhG5xC980390iXite58xH-bw5Pm9vI22OOlobBOXWLMnvCaPlI/s320/email.png) no-repeat 7px 10px; border:1px solid #ddd; font-family:Arial,sans-serif; font-size:13px; font-weight:bold; color:hsla(0,0%,27%,0.69); width:150px; height:24px; margin-left:5px; margin-top:10px; padding:5px 15px 5px 28px;vertical-align:top; display:inline-block;}
.topsubsboxname:hover,.topsubsboxemail:hover {border:1px solid #bebebe; box-shadow:0.5px 1.5px 2px rgba(5,95,255,.1);}
.topsubsboxbutton {-moz-box-shadow:inset 0px 1px 0px 0px #bbdaf7;-webkit-box-shadow:inset 0px 1px 0px 0px #bbdaf7;box-shadow:inset 0px 1px 0px 0px #bbdaf7;background:-webkit-gradient( linear, left top, left bottom, color-stop(0.05, #00B3FF), color-stop(1, #349ECB) );background:-moz-linear-gradient( center top, #00B3FF 5%, #349ECB 100% ); filter:progid:DXImageTransform.Microsoft.gradient(startColorstr=&#39;#00B3FF&#39;, endColorstr=&#39;#349ECB&#39;);background-color:#00B3FF;  margin-top:12px;  margin-left:5px;-moz-border-radius:6px;-webkit-border-radius:6px;border-radius:6px;border:1px solid #84bbf3;display:inline-block;color:#ffffff;font-family:arial;font-size:15px;font-weight:bold;padding:6px 10px;text-decoration:none;text-shadow:1px 1px 0px #528ecc;}.topsubsboxbutton:hover {background:-webkit-gradient( linear, left top, left bottom, color-stop(0.05, #349ECB), color-stop(1, #00B3FF) );background:-moz-linear-gradient( center top, #349ECB 5%, #00B3FF 100% );filter:progid:DXImageTransform.Microsoft.gradient(startColorstr=&#39;#349ECB&#39;, endColorstr=&#39;#00B3FF&#39;);background-color:#349ECB;}.topsubsboxbutton:active {position:relative;top:1px;}
  #socialsection {float:left;margin-top:20px;}
  .socialheading{font-size:20px; font-family:&#39;Source Sans Pro&#39;; text-align:right;margin-right:20px;text-shadow:1px 1px 1px #ABABAB;font-weight:bold;}
  .socialicons ul {list-style:none; display:inline;float:right;margin-top:10px;margin-right:10px;}
.socialicons li {opacity: 1;float:left;padding: 0px 10px 0px 0px;}
.socialicons li:nth-child(6) {padding: 0;}
.socialicons li a img{height:49px;width:49px}
</style>

<!-- Top Subsbox By Www.BloggerYard.Com Start -->
<div id='byard-topsubsbox'>
<div id='subscriptionsection'>
<div class='subsbox-heading'>Subscribe For Free Updates!</div>
 <form action='http://feedburner.google.com/fb/a/mailverify?uri=heathtricks' class='byard-subsbox-form' method='post' target='_new'>
  <input class='topsubsboxname' name='name' onblur='if (this.value == &apos;&apos;) {this.value = &apos;Your Name&apos;;}' onfocus='if (this.value == &apos;Your Name&apos;) {this.value = &apos;&apos;;}' value='Your Name'/>
  <input class='topsubsboxemail' name='email' onblur='if (this.value == &apos;&apos;) {this.value = &apos;Your Email Address&apos;;}' onfocus='if (this.value == &apos;Your Email Address&apos;) {this.value = &apos;&apos;;}' value='Your Email Address'/>
  <input class='topsubsboxbutton' type='submit' value='Sign Up!'/>
 </form>
  <p style='margin-top: 8px;font-size: 13px;text-align: center;font-family: Source Sans Pro;font-style: italic;font-weight: 600;'>We&#39;ll not spam mate! We promise.</p>

  </div>
<div class='socialicons'>
  <div class='socialheading'>Become Our Fan on Social Sites!</div>

<ul>
<li><a href='https://www.facebook.com/heathtricks'><img src='https://blogger.googleusercontent.com/img/b/R29vZ2xl/AVvXsEiMrtu28qzQ3iBH281jS5eDQIoD0F222kIilXJ87nUFGibLwbHydIZunyj5NcAgCypNZ2I7IBnvr8u3Ag4YlPzpCQfR5tZMqL6BZnWFogd_vYvhfCqxq5IPJ2K39Mnxy8KilrHuzn2B81jr/s1600/facebook_64.png' title='Facebook'/></a></li>
<li><a href='https://twitter.com/heathtricks'><img src='https://blogger.googleusercontent.com/img/b/R29vZ2xl/AVvXsEjgBpcERlTMQZ2Tjz3hMgU3jSnyLk56ouPuBPq8krzICUV8kORU-9ZkFq-pkdYOvjbHK1qj7zCW90FS5NyEipjl0WLbbHtUueyx-Eq78QSKYM20WLwvRBAcCRyBrusUq8rLiq4Ucg_3ILzl/s1600/twitter_64.png' title='Twitter'/></a></li>
<li><a href='https://plus.google.com/101996924620264665717682/'><img src='https://blogger.googleusercontent.com/img/b/R29vZ2xl/AVvXsEjVGCtmQ3no8w3H5vaCFucwgoz9piOS4XMhEZxxZvpB7ezs8-RRIFU3FVYjhnzJcgr5ISSE4wLV4Lr-mhpW-TTzPL8nKYzo336rG7UJzUqE4WFxUnBxlfV_ZgS6YzHu9umBHc7P80EICUgM/s1600/google-plus_64.png' title='Google +'/></a></li>
<li><a href='http://feeds.feedburner.com/heathtricks'><img src='https://blogger.googleusercontent.com/img/b/R29vZ2xl/AVvXsEjx_Da_z8IokFoEwhDJixRHj-kHSG83vYSMcqGp4m9L-pnHlOC6auu9w_ivzdDZQejOQqMSiQlC8roGX2YMpedHO3AHN4fhb0vTVS14hyIYW0h5vvAWW3rdTyUmbbXMUxu8wpRV4haQwdMN/s1600/rss_64.png' title='Rss'/></a></li>
<li><a href='http://pinterest.com/heathtricks/'><img src='https://blogger.googleusercontent.com/img/b/R29vZ2xl/AVvXsEjkry2ngveFYeIR8dUMuuDO_Mr0mjm5t03f3gBfffFH0oqZHOM1LRDBl3SoaM_Ta_I_ZEtmHLPcX9j0VCqdMhc2BuH8S80h1WGSkn-UbHor4yfWxAwVGGKhd8pfGX350H7bUlQceVm65ka_/s1600/pinterest_64.png' title='Pinterest'/></a></li>
</ul>  </div>
    </div>
<!-- Top Subsbox By Www.BloggerYard.Com End -->
  • Replace The Highlighted URLs With Yours
  • Click "Save" and You've Done!

how to Adding Custom Robots.txt File In Blogger heathtricks

In our previous, we had discussed aboutcreating professional 404 error page and here we're back with another great and most important tutorial for all of you. Today we're going to enable a custom Robots.Txt file in Blogger which can really help you to index your blog in Google faster and it will also make your blog more search engine friendly. Robots.Txt file is used in every website but in the past with old Blogger interface we're unable to add that file in our blogs but now in the new interface which is really amazing with a lot of great features we can enable that file in Blogger. Those who don't know about Robots.Txt file can read the below passage to understand that file.

What is Robots.Txt File ?

That is a simple text file in which the website owner use to write the commands for the search engine's crawler. It means that we can instruct the search engine's crawler with that file that we part of our site can be indexed or not. That commands are written in different coding which is only for search engine's crawler. You can see your robots.txt file just by following the below URL.
http://www.yourdomain.com/robots.txt

 What Areas You Should Disallow For Crawling In Your Blog?

So, This question maybe coming in your mind that which areas of your blog you should disallow for crawling. In fact, You can disallow any area of your blog but there are some important areas for disallowing. If you disallow those areas then you blog will be more search engine friendly and that areas are Search Result pages, Archive pages and labels pages. However, Below I'm giving you an search engine friendly robots.txt file which will help you a lot.

Enable Custom Robots.txt File In Blogger

So, This process is so easy just follow the simple steps below.
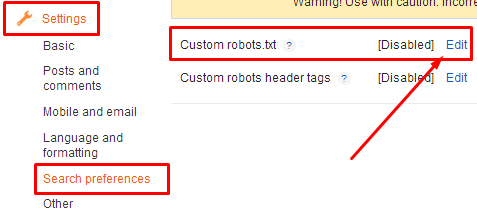
  • Go To Blogger >> Settings >> Search Preferences
  • Look For Custom Robots.Txt Section In The Bottom and Edit It.
  • Now a check box will appear tick mark "Yes" and a box will appear where you have to write the robots.txt file. So if you want to use our file then copy the code below and paste it in that box.
User-agent: Mediapartners-Google
User-agent: *
Disallow: /search?q=*
Disallow: /*?updated-max=*
Allow: /
Sitemap: http://www.yourdmomain.com/feeds/posts/default?orderby=updated
  • Note : The first line "User-agent: Mediapartners-Google" is for Google AdSense. So if you are using Google AdSense in your blog then remain it same otherwise remove it. 
  • Click "Save Changes".
After adding the file now you must be wanted to understand your file that what we have allowed and disallowed. So, I've listed every command with detail below.

Explanations

  • User-agent: Mediapartners-Google : So, This is a first command which is for those blogs which are using Google AdSense if you are not using Google AdSense then remove it. In this command, we're telling the AdSense's separate robot that crawl all pages which are having AdSense Ads.
  • User-agent: * : Here the User-agent is calling the robot and * is for all the search engine's robots like Google, Yahoo etc.
  • Disallow: /search?q=* : This line tells the search engine's crawler not to crawl the search pages.
  • Disallow: /*?updated-max=* : This one disallows the search engine's crawler to do not index or crawl label or navigation pages.
  • Allow: / : This one allows to index the homepage or your blog.
  • Sitemap : So this last command tells the search engine's crawler to index the every new or updated post.
Got It ?

How Can I Add a Command For Disallowing Any Page?

So if you are interested in adding your own command then you can also do it. Here is an example for disallowing the contact page Disallow: /p/contact-us.html . So, first you will need to replace /p/contact-us.html which is other part of the domain with another. It mean you just need to exclude the main domain and just type remain part of the page. Two things you should remember that add your custom command below User-agent: * and per line = per command. If you still have not got it then ask in comments please.

how to Add Alt and Title Attributes To SEO Optimize Images

If you are the regular reader here then you probably know that previously we shared the drop down navigation menu for blogger and today we're going to share an SEO tip by which you can optimize blog post images and get traffic from image search. As there are many important factors of SEO, optimizing images is also one of them. We can easily optimize them by the use of ALT and Title tags. These tags will help us in optimizing images, making the blog more SEO friendly and getting organic traffic from image search. If you put the targeted keywords in the post images then you've chances of getting higher rank in search results. So below I've described the basic thing that how these tags works.

How ALT and Title Tags For Image Optimization Works?

Before understanding the process, it is important to know that what actually ALT and Title tags are? These are the HTML attribution or tags which are used for images. ALT is specially for image whenever you can use the Title tag anywhere. These tags describe about the thing in which they are implemented. For example, if I add "Best SEO Tips" keyword in image then it will tell the search engine's crawler that this image is about SEO Tips and this will help the search engine robot to understand the media content and rank them appropriately. If you put the most searched, popular and appropriate keywords in your image then your images will be ranked higher in image search results and you will be getting enough traffic from it.

How To Add These Tags To Images In Blogger?

So if you're using Blogger Platform for your blog then continue reading. In WordPress, that platform automatically take and add the keyword from image name but in blogger you will need to implement this manually. In order to implement this tactic in your images, Go To Blogger >> New Post >> Upload Image.


After adding images, Click on the image, some options will appear in the horizontal line. Click on the Properties.


Now the image properties pop up will appear with the ALT and Title fields. Simply write the appropriate and main keywords in those fields and hit the OK button.


After adding keywords, now complete your post and also SEO optimize your blog post and then simply publish it. 

Important 5 Blogger Widgets Everyone Must Use

Widgets and plugins are also part of our blog which are used for making blog more functional. After template, we also need to implement some widgets in our blog. Newbies might be aware of some important widgets but everyone must use some important widgets due to some reasons and we'll describe them below. There are many different widgets for blogger out there on the internet such associal sharing widgetnotification bar, social content locker, related posts, featured posts, etc. Each widget has it's own benefits but they are used when it's necessary. As I said above that there are some important widgets which we use in our blog forever so below I'm going to show you those widgets and also why to use them all the time in our blogs.

1. Navigation Menu

The first important widget and item is Navigation menu that is important for every blog and website. New blogger templates that are made in 2013-2014 are having built-in navigation menus because it's important but old templates might not contain built-in menus. In order to make the navigation of blog better we should implement drop down easy menu. When any new visitor will come on our blog then he'll be able to know that what kind of content is published here and he/she can navigate it easily through that menu. Navigation menus also helps to improve the internal linking of blog

2. Social Subscription

When you've created your blog than you might also have created social network accounts of your blog including Facebook Page, Twitter Account, Google+ Page etc. We make such type of accounts to get engaged with our readers and visitors on social network as everyone is on social networks these days. These accounts also helps to send immediate notification to our all fans about blog updates and also in collecting new fans and increasing blog traffic. Well, Now here it's important to implement social subscription widgets to let people know that which is our official social account so that they should subscribe and start getting notified. 

3. Email Subscription

All the time on the internet, email is most trending thing. Email and social networks has helped to connect the world. Almost every company, site, blog and forum on the internet is trying to make email subscribers or email list of their users. There are several reasons for it. First, we can make money through email list. So, we should also build email subscribers list of our blog and for that email subscription widget is important. There are many email subscription widget that you can use. That can be implement in sidebar, header and below post to attract more subscribers. 

4. Social Sharing

So, we're on the 4th important blogger widget of the list and it's social sharing widget. Look, social subscription and social sharing both are different things. In subscription, people subscribe to our social accounts and become fans while in social sharing, people can share the blog posts with their friends, family and relatives through social accounts. Social sharing widget help us to spread our blog on social networks and it definitely increases blog traffic. There are also many social sharing widgets with different functions like floating social bar, horizontal social bar, social buttons on image hover etc. We can use social sharing widget below post title and below post to attract more shares.

5. Related Posts

At last! This is the 5th last important blogger widget that everyone should use on their blogs. So, This is related posts widget. When someone reads your article and after completing he might leave your blog directly but what if we bring him on another blog post? For this reason, we use related posts widget which is displayed below every post so that we someone completes any article then he may also read another article on our blog. That widget displays some related and recommended posts that can also be useful for a particular reader. There are also many designs for related posts widgets such as related posts widget with thumbnail, only title, image with tool tip etc.