


What is Robots.Txt File ?
That is a simple text file in which the website owner use to write the commands for the search engine's crawler. It means that we can instruct the search engine's crawler with that file that we part of our site can be indexed or not. That commands are written in different coding which is only for search engine's crawler. You can see your robots.txt file just by following the below URL.
http://www.yourdomain.com/robots.txt
What Areas You Should Disallow For Crawling In Your Blog?
So, This question maybe coming in your mind that which areas of your blog you should disallow for crawling. In fact, You can disallow any area of your blog but there are some important areas for disallowing. If you disallow those areas then you blog will be more search engine friendly and that areas are Search Result pages, Archive pages and labels pages. However, Below I'm giving you an search engine friendly robots.txt file which will help you a lot.
Enable Custom Robots.txt File In Blogger
So, This process is so easy just follow the simple steps below.
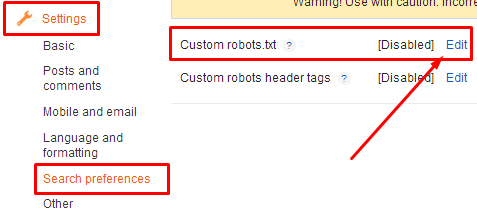
- Go To Blogger >> Settings >> Search Preferences
- Look For Custom Robots.Txt Section In The Bottom and Edit It.
- Now a check box will appear tick mark "Yes" and a box will appear where you have to write the robots.txt file. So if you want to use our file then copy the code below and paste it in that box.
User-agent: Mediapartners-Google
User-agent: *
Disallow: /search?q=*
Disallow: /*?updated-max=*
Allow: /
Sitemap: http://www.yourdmomain.com/feeds/posts/default?orderby=updated
- Note : The first line "User-agent: Mediapartners-Google" is for Google AdSense. So if you are using Google AdSense in your blog then remain it same otherwise remove it.
- Click "Save Changes".
After adding the file now you must be wanted to understand your file that what we have allowed and disallowed. So, I've listed every command with detail below.
Explanations
- User-agent: Mediapartners-Google : So, This is a first command which is for those blogs which are using Google AdSense if you are not using Google AdSense then remove it. In this command, we're telling the AdSense's separate robot that crawl all pages which are having AdSense Ads.
- User-agent: * : Here the User-agent is calling the robot and * is for all the search engine's robots like Google, Yahoo etc.
- Disallow: /search?q=* : This line tells the search engine's crawler not to crawl the search pages.
- Disallow: /*?updated-max=* : This one disallows the search engine's crawler to do not index or crawl label or navigation pages.
- Allow: / : This one allows to index the homepage or your blog.
- Sitemap : So this last command tells the search engine's crawler to index the every new or updated post.
Got It ?
How Can I Add a Command For Disallowing Any Page?
So if you are interested in adding your own command then you can also do it. Here is an example for disallowing the contact page Disallow: /p/contact-us.html . So, first you will need to replace /p/contact-us.html which is other part of the domain with another. It mean you just need to exclude the main domain and just type remain part of the page. Two things you should remember that add your custom command below User-agent: * and per line = per command. If you still have not got it then ask in comments please.


0 comments:
Post a Comment